How to Create an Unforgettable Training Session in 8 Simple Steps
How does learning work? A clever 9-year-old once told me: “I know I am learning something new when I am surprised.” The science of adult learning tells us that, in order to learn new skills (which, unsurprisingly, is harder for adults to do than kids) grown-ups need to first get into a specific headspace.
In a business, this approach is often employed in a training session where employees learn new skills or work on professional development. But how do you ensure your training is effective? In this guide, we'll explore how to create an effective training session plan and run engaging training sessions.
As team leader, project manager, or consultant, you may often be asked to put on the trainer’s hat and upskill a team in some new concept or process.
In practice, designing a training session includes setting intentions and understanding what the practical application of learning will be in the daily lives of the people you are training.
I’ve often had the luxury of being the facilitator for training sessions, supporting the group’s learning journey while expert content providers provided specialized information on key topics.
In this article, I’ve put together some lessons I’ve picked up along the way about designing great learning experiences: tips, tricks, and workflows that will help you create unforgettable training session plans, whatever your topic.
We will be looking into:
The first thing you need to do when designing a new training course is draft a general outline of your training session plan. This should include your objectives, an agenda of activities and timings, a task list, and a list of resources. Let’s see, in more detail, what all of that entails.
What is a Training Session Plan?
A training session plan is a structured and organized document that outlines the framework and details of a training program or session. It’s a roadmap for trainers and facilitators, helping them design and deliver effective learning experiences. A well-crafted training session plan ensures that learning objectives are met, participants are engaged, and the training session is both informative and interactive.
Key components of a successful training session plan typically include:
- Objectives: Clearly defined learning goals that specify what participants should know or be able to do by the end of the training session.
- Agenda: A detailed schedule of activities, topics, and the timing of each segment within the session. Depending on your style, you might even include a script. If collaborating with other trainers, it can also be useful to delineate who is running which section and who is supporting (see our co-facilitation guide for more advice on this).
- Materials: Any training material, resources, and tools required for the session, such as presentations, handouts, workbooks, or multimedia aids. In virtual sessions, this can also include links to resources you may share during the training. These are great to add to your agenda so everything you need is in one place.
- Follow-up: Plans for gathering feedback from participants and assessing the overall success of the training session. This might include choosing a survey tool, having a paper exit form, or having an activity planned to facilitate this.
A training session plan is a valuable tool for trainers, educators, and anyone responsible for imparting knowledge or skills to others. It provides structure and coherence to the training process, helping to achieve specific learning outcomes and create a positive and impactful learning experience.
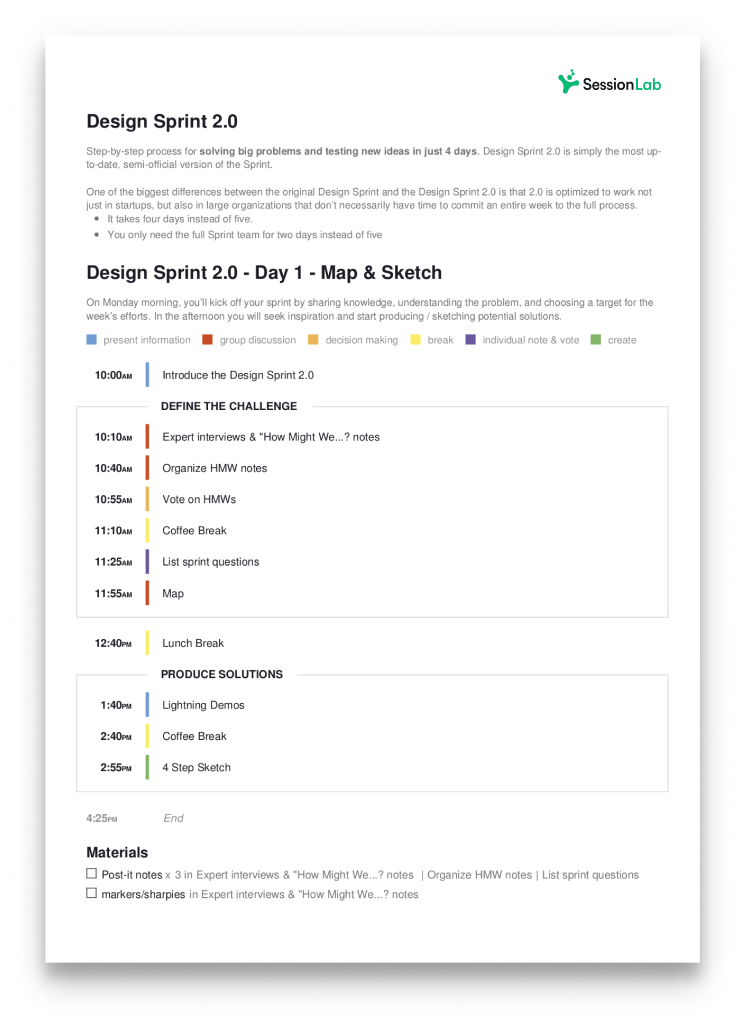
In SessionLab, you can build your training session plan in minutes by dragging and dropping your training content into place. Add instruction, materials, and clear timing to complete your agenda and refine the ideal learning experience.
When it comes to delivering your training sessions, you can export a customized PDF to share with your participants and co-trainers. Holding your training session online? Share an online training agenda so your learners can see what’s coming and follow along too!
Creating Effective Training Sessions in 8 Steps
Having a clear, visually attractive session plan is key to getting clients and stakeholders on board. What began as a mere idea is now turned into a detailed plan.
Having it all mapped out allows you to clearly communicate your intentions, show how you will reach your client or team’s objectives, collect feedback and make decisions about any changes.
When I’m creating a training plan, the first thing I do is write out the training objective. I’ll then jot down a few ideas of activities I’d like to run.
Next, I’ll open a new agenda (or an old one, if I am modifying an existing template) and set start and end times, so I’m clear about how much time I actually will have with my participants.
While every trainer has their own style and approach to creating a lesson outline, the process of planning a training session can be broken down into 8 simple steps:
Step 1: Set Learning Objectives
Before a training course begins, it probably is just a vague need in the mind of a team leader or client. To turn it into reality, the first thing to do is clarify what exactly that need is. What new skills need to be shared? Is it about sharing information, or learning to do something practical?
This sort of question can lead you (and your team) to define the learning objectives for the training course.
Learning objectives are typically two or three short sentences that describe the condition participants should have reached by the end of the training. It’s common to state these in the present tense. Typical examples sound something like this:
- [At the end of the training] participants are able to articulate and explain the difference between concepts A, B and C;
- And/or are able to apply process D in real-world situations.
To further refine and clarify these objectives you may need to set up interviews with relevant parties, and even, if possible, with prospective participants.
It’s worth spending some time refining each learning objective. These short sentences can help guide all the choices to come. If you’re following Gagne’s instructional design principles, you’ll know all about how often you’ll refer back to your learning objectives.
If at a later point in the design process, you find yourself undecided among different possible activities, going back to the learning objective will help you make choices in such a way that prioritizes keeping the design coherent.
Step 2: Use a Framework
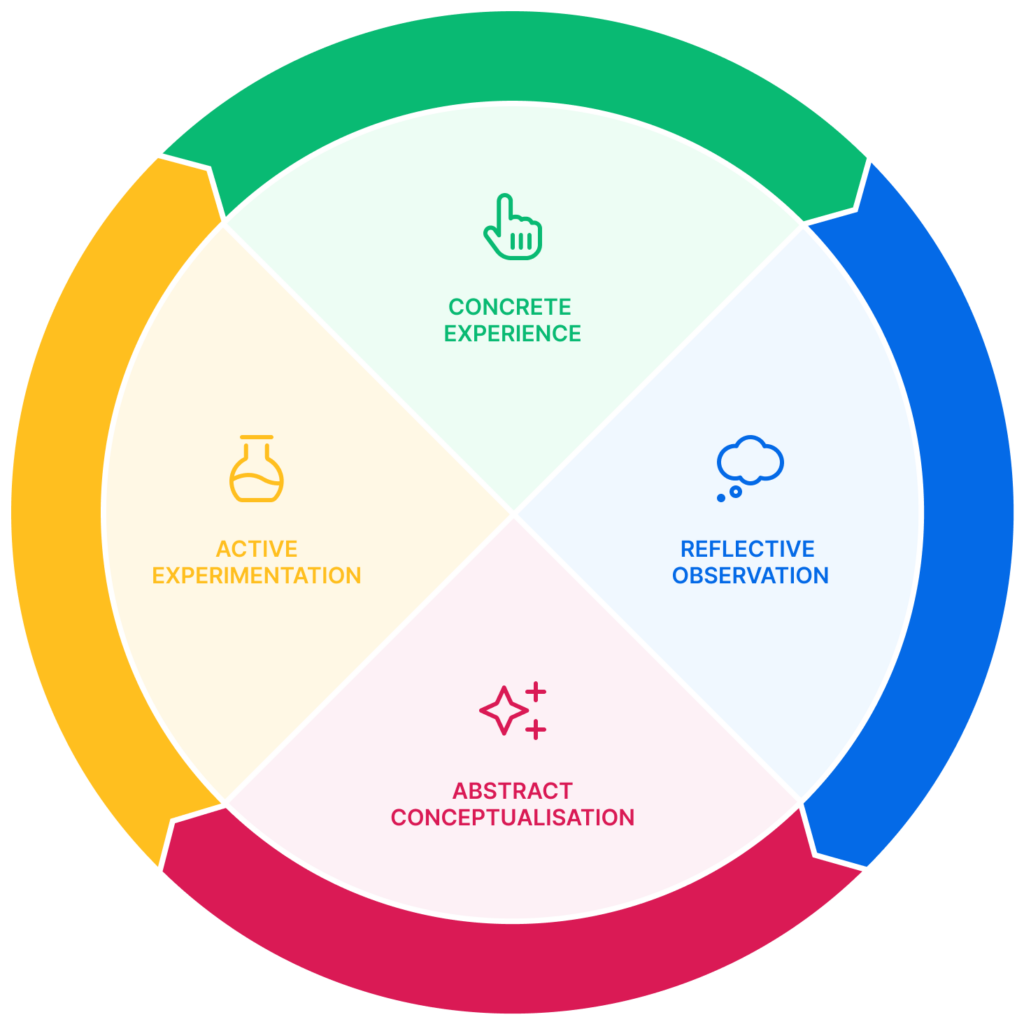
When it comes to workshops designed to support learning, the best-known framework to support design is probably Kolb’s learning cycle. Originally outlined in 1984, this model of Experiential Learning describes four stages that support practical, hands-on education.
Kolb’s learning cycle is widely used in training design, especially when it comes to working with adult learners. Simply go through it step-by-step and include activities for each of the four parts of this cycle.
- Concrete experience, with room for practical, experiential activities;
- Reflective observation: a time to debrief, form opinions on what the exercise revealed, and discuss them with others;
- Abstract conceptualization, when it’s up to the trainer to offer models, theories and frameworks conducive to deeper understanding and, lastly
- Active experimentation, in which participants are guided to begin applying new learnings to real-world situations, for example with a role play or simulation.
You can see a general example of how these activities come together in a workshop in this ready-made template for a training session.
Using SessionLab, open this Essential Training Session template and simply drag-and-drop your additional content onto it, radically speeding up your design process!
While I definitely recommend basing your training plan designs on Kolb’s learning cycle, it is not the only framework out there. When working on environmental topics, I often rely on Joanna Macy’s Work that Reconnects “Spiral”, which includes four steps going from Starting with Gratitude to Taking Action.
For short sessions, even something as simple as “Why/How/What” can help create clarity. Start with an activity to discuss why a new tool or process is needed (Why), include a presentation to illustrate the new process (How) and wrap it up with a practical use case (What).
Whatever your preferred framework, the takeaway of this section should be that basing your training upon a general structure is the antidote to chaotic, unfocussed training experiences. Using such a high-level framework will help you keep it coherent and ensure a smooth learning experience for your participants.
Step 3: Create an Opening Section
Adult education principles stress the importance of preparing trainees for learning. Before we can open up to new learning, we need to feel safe in our environment, have a sense of who the other people in the room are, and understand what is expected of us as well as the practical purpose of the session. Those are quite a lot of boxes to tick in what is generally a rather short opening slot!
The best trainers out there are skilled in participatory education and have a lot in common with facilitators (for more on the commonalities between teachers and facilitators, you can check out our article on what teachers can learn from facilitation practices). Good trainers and good facilitators, generally speaking, will take a solid chunk of time, let’s say the first 30 or 45 minutes of a session, for introductory activities that help set the stage.
Far from being a waste of time, these opening sections serve several purposes. Practical information such as going through the agenda or describing certain features of the location (such as where to find drinks, for example) are helpful in that they allow attendees to familiarise themselves with the situation and relax.
Rounds of introductions or getting-to-know-you activities are particularly important. In the words of George Lakey, author of my go-to book for training tips, Facilitating Group Learning, ‘“Who am I in this group?” is the participant’s preoccupying question as any learning group convenes, and there’s limited capacity for learning anything else until this question is answered’.
As you prepare your training plan, consider what activities you will run at the opening, including making space to describe the general aims for the day and giving time for attendees to reflect on their intentions. Use an agenda planner to easily add important information and structure your session.
Even before the opening section, there are things you can do to start introducing the key topics of your training to your learners, such as sending a welcome email. Make pre-course communications engaging and interactive, for example through a quick questionnaire or a video, to increase the likelihood of participants actually reading it!
Top tip: add a “before the course” section to your agenda plan to include a checklist of actions that need to be taken before the training begins.
Step 4: Structure the Agenda
Now that you know the general learning objectives and have a framework set up, as well as an opening section, the next thing to do is go through the agenda and add activities for each section of your framework.
If you are using Kolb’s learning cycle, for example, different types of activities naturally lend themselves to being used for each step. Start with a practical exercise, thereby providing “concrete experience”, then move on to structured dialogue, such as a 1-2-4-all or World Café activity, to stimulate reflective observation.
The third step, abstract conceptualization, is the right time for you as trainer to step in front of the group, highlight the most important points mentioned, and provide mental models, frameworks, and information. Finally, case studies and simulations are great ways to include active experimentation in a training setting.
In my experience with training, less is certainly more. Just a few days ago, I was asked to demonstrate a range of different activities on conflict resolution during a train-the-trainer workshop. Participants had been given a study manual that included three exercises, and my client was keen for them to experience them all.
I argued that, in the limited time available, it was more important to thoroughly debrief activities, answer questions, and for participants to try out giving instructions themselves. In the end, we only ran one single activity, but I am confident that all attendees went home with the ability to lead that exercise. This is much better, in my view, than having experienced a bunch of different “games” with not much clarity about how to use them.
In many cases, training sessions are set up so that participants can learn how to do something on their own. The most common complaint about workplace trainings is that it was not relevant to participants’ real lives. Your job as a top trainer is to make sure your sessions are relevant. Having less activities but including a lot of space for debrief, discussion, practical applications and trying processes and tools out directly are the keys to success.
Having participants apply new tools directly, in the safe space that training provides, is the best way to ensure they retain what you are teaching. When I train students to lead workshops, I generally dedicate the last half of the session to asking learners, divided into groups, to create and guide activities for the other participants. Afterwards, they give each other feedback, and try again!
Let’s look back at the two examples of generic learning objectives we used earlier in the piece. By the end of the training participants should, we said “Be able to articulate and explain the difference between concepts A, B and C” and “to apply process D in real-world situations”.
Having time and space during the training to try to “articulate and explain concepts A, B and C” to their peers, as well as to try out “process D” are essential to achieving those goals. Testing and trying new tools (versus just sitting and hearing about them) is more likely to guarantee they are remembered and put to use.
Despite how obvious this sounds, opportunities for participants to take center stage and put their new competencies to the test are still all too rare in training programs.
Step 5: Include Multiple Learning Styles
As trainers and facilitators, we naturally have a general tendency to develop sessions that are ideal for people who think like us. As someone who loves words, and learns through sharing with others, I tend to fill my plans with dialogue sessions in small groups, huddled around a central question, with a poster and pens to keep notes.
That’s great, but what about the people in the room who retain key ideas when they are shared visually? And how about those who learn better through individual reflection? When creating an agenda for your training session, make sure you’ve given thought to different learning styles and made some space for everyone.
An excellent training session will combine ample time for individual reflection, discussion with others, and practical applications. It should include creative spaces such as using visual thinking, art, or building blocks, as well as music. Whenever possible, enable participants to choose their own pathway, for example by offering different ways of interacting with the material (with a discussion, by turning it into a poster, and so on) at various tables.
Different preferences and tendencies in terms of learning styles are only one of the many ways diversity will show up in your participant groups. As you define activities, remember to keep in mind how accessible they will be to your attendees. You may have this information in advance (is anyone challenged in terms of mobility? Sight?) or you may discover this only during the training itself.
Just a couple of months ago I was chatting with a participant a few minutes before the training when he told me of a hearing impairment and kindly explained what I should do to make myself heard. My mind raced forward to a moment in the workshop when I had planned to ask everyone to pair up and discuss a question. In the small room we had, twelve people talking at the same time would surely be overwhelming for him!
Luckily, we had outdoor space available, so I asked trainees to spread out in space and take advantage of the sunny day. This reduced the level of noise drastically, making it easier for everyone to hear one another.
Unless you are working with an established team, it’s highly unlikely that you’ll know everyone’s needs in advance or notice them during the workshop! I like to improvise, but if you are just starting out as a trainer or know that you like to stick to the plan, make sure you have considered accessibility needs and have activities planned that will work for everyone.
Consider the “cut-curb effect”: an activity accessible for people with disabilities will also be accessible to everyone else. The term refers to how a slide cut into a sidewalk to facilitate access to wheelchairs will also make life easier for families with strollers, or someone with a heavy trolley coming in from the train station.
Similarly, asking my group to spread farther out so it would be easier to hear one another in pairs made the experience more pleasant for everyone, not only the gentleman with a hearing impairment!
Lastly, as you go through your agenda take some time to ponder: how could I include some elements of novelty and wonder in the space? Bringing colorful items, games, music and posters are all ways of adding creativity, and an element of surprise.
The most common way for facilitative trainers to bring innovation to a learning space is to start by changing the seating arrangement. As a participant told me recently in feedback: “I came to the event assuming we would sit and listen, but then I saw the small clusters of chairs around those little coffee tables I went ‘oh-oh’, we are actually going to have to do something here!”

Consider how the seating arrangement and light levels will influence your learning space. To learn more about how seating influences learning and interaction, you can delve into our dedicated guide to room setups.
Step 6: Pay Attention to Closing and Follow-up
As you enrich your agenda with ideas and details, you’ll probably start wondering about how to make it all fit in the allocated time. Rather than shave off a few minutes here and there or, worse, remove breaks, opening or closing sections (more on those later), go back to the original learning objectives, and get rid of whole activities. Remember: less is more!
As you iterate and change your plan, SessionLab’s agenda planner will come to your rescue by automatically adjusting the time of each slot based on your changes. I usually start my designs by locking the start and end times, as well as the time of any lunch breaks.
While I don’t mind going off schedule during activities if something takes more or less time, I am really keen to make sure the kitchen and catering staff get to do their job as we’ve planned. More importantly, I hold ending times sacred.
To make sure we end on time and don’t have to hurry through closing activities, I generally reserve a 30-minute slot at the end of the day for closing and feedback.
For a training session to end successfully, at least three things are needed:
- Clarity about the next steps, whether these are personal action plans, dates of future lessons, or information of the “you’ll be getting a certificate of attendance in your inbox on Monday” kind;
- A closing moment or small ritual, designed to create a memorable connection and a sense of completion. This can be as simple as asking participants to unmute their microphones if you are working online, and saying “goodbye” in their native tongues. I like to close by referring back to whatever activity we started with. If we opened with introductions in a circle, for example, I’ll invite to close the day with a few words from each participant (but standing up, to make it quicker!);
- Time for participants to give feedback back to you, the trainer. I recommend this be done in at least a couple of ways so that people have the option to give you their opinions both publicly and privately, both personally and anonymously. It’s really lovely to hear a big circle of “thank you” at the end of an intense training, but I also deeply value the critical feedback that often only emerges in written form. You can enable this, for example, with posters by the door on which participants are asked to leave a comment before leaving, or in a questionnaire sent soon after the training ends.
With regular evaluation and feedback built into your training plans, you create a continuous cycle of learning and improvement. Your future trainings will get better and more impactful based on the input from participants. Your team benefits from increasingly targeted, relevant, and engaging learning experiences.
Be sure to also find time for some self-assessment, which is essential for your own professional development. Take notes during your session where possible (your agenda is a great place for this) and find space to consider what went well and what could have gone better.
When it comes to running your training sessions again, duplicate your SessionLab agenda and make adjustments with these learnings in mind. Not only will you have saved time designing an effective training session plan, but you’ll also have improved the quality of your training methods!
Step 7: Prepare Training Materials
With your session structure in place, it’s time to build out any presentations, workbooks, exercises, or other training materials you may need. Keep the following tips in mind:
- Focus on visuals: Use photos, graphics, charts, and diagrams to bring your content to life. Visual aids are engaging and can help reinforce learning though be sure to keep it relevant to your learning experience and your audience. GIFs and memes can be great, but are they right for your learners? As with any aspect of your training, be sure to balance and vary such elements where possible.
- Keep text minimal: On presentations and handouts, use bullet points and headlines rather than long paragraphs. Your verbal explanation and activities are more important than written text. I find it useful to think of the text in a visual presentation as a prompt for me and an anchoring point for learners, rather than a copy of my script.
- Use real-world examples: Share stories, case studies, and scenarios from relevant work experiences or environments. These make concepts more concrete and easier to apply. Where possible, include further reading or research opportunities for learners to explore after the session is done.
- Use video as necessary: video content can be a wonderful way to enrich your training materials. Bringing in an outside voice or expert can be transformative, and it also gives you as a trainer a chance to take a breath and adjust if needed.
- Borrow, reuse and reference: no single person is an island. Find existing resources, references and materials and reuse or adapt them if permission is available. Creating a training program can be an enormous undertaking, and it’s okay to stand on the shoulders of training giants who came before you. Just remember to reference and give credit!
- Provide workbooks or worksheets: For more complex topics, give participants resources they can refer to again after the session. Workbooks with examples, diagrams, checklists, and room for note-taking are helpful for continued learning.
- Use an interactive presentation approach: Don’t just read through slides. Discuss key points, give examples, ask questions, share stories, and prompt participants to add input in their own words. Your energy and engagement will fuel the learning experience.
- Practice and prepare: Know your content inside and out. Practice your presentation and run through any activities or discussions to ensure a smooth facilitation experience. It can be easy to throw off your rhythm if you present a slide you are unfamiliar with!
With compelling and interactive materials, your training session will be both impactful in the moment and valuable as an ongoing resource for your team.
Well-designed workbooks, presentations, exercises, and discussions can continue to support learning long after the session has ended, contributing to real change and improved performance. Check out our guide if you need help designing engaging visual presentations.
Once you have a draft plan for your training session, it’s time to share it with colleagues and clients, and start collecting feedback. In my experience, when designing trainings on behalf of a client, they will definitely want to see a high-level overview of my plan as early as possible. Discussing concrete details of the plan is often the point where intentions and needs are really clarified.
For example, I recently led a 1-day teacher training session that included some tricky logistics: reaching, and coming back from, the coffee break area took more than 10 minutes each way! At first, it seemed like my clients found this detail irrelevant: it was only when looking at the actual plan for the day that they realized what this entailed. Seeing the timing laid out eventually led to changing the location of the morning coffee break, and using the walk in the afternoon for a paired walk exercise.
As facilitator and trainer, it’s your job to go through the agenda in your mind and imagine how things will work in practice, and communicate this to clients, colleagues and other stakeholders (such as staff in charge of logistics). The SessionLab planner can be a great support at this stage of planning a training course, thanks to visualization features that allow you to share different views of your agenda with different people.
You can have a general overview to share with participants, for example in a welcome email, as well as a more detailed schedule including materials and practical notes for your clients, and a fully fleshed out plan, with your notes and a script, to keep for yourself. All these can be printed, exported, or shown online, including by sharing a QR code.
Conclusion: Deliver an Unforgettable Training Session
With careful planning and preparation, you can facilitate a training session that motivates your team, expands their knowledge and skills, and drives real performance improvement.
By following the 8 steps in this guide, you will assess your team’s true needs, establish clear objectives, apply effective adult learning principles, develop valuable interactive content, and build in mechanisms for continuous improvement. Your confidence in your abilities and passion for the topics will shine through as you deliver an engaging learning experience for your participants.
While training sessions require effort and time to plan, the rewards of an empowered, high-performing team make it worth the investment. You help individuals progress in their careers and strengthen your organization by developing talent from within.
Use these strategies to plan future sessions and deliver an unforgettable experience that creates a lasting impact. With practice, you will be facilitating transformational learning opportunities and inspiring your employees to reach their full potential.
What next?
This article focuses on getting your training agenda ready. If you want to continue learning about the other steps required to deliver great workshop experiences, here is our full guide to planning a workshop.
Ready to plan your training session? Start from an existing basic template for a training session based on Kolb’s learning cycle and add your own favorite activities!
Many of the theories and tips referenced in this article sit at the border between facilitation and teaching. To learn more about the commonalities and differences of the two professions, and how we can learn from each other, check out our piece on Teachers as Facilitators.
Designing a training course with live and async elements? Explore our blended learning course template to see how you might structure such a course and collaborate with your team and subject matter experts in one place.

Leave a Comment