How to organize a workshop with SessionLab

In the next few pages, I’ll walk you through how I move from a blank canvas to the first version of a workshop design. I’ll illustrate how, as a freelance facilitator, I use SessionLab step-by-step to organize information, sketch out early ideas, and create a draft agenda, ready to share.
SessionLab is my facilitation back office: it’s the virtual desk where I do all the preparation work for each workshop, session, and event. It allows me to keep my notes in one place, design efficiently, and easily collaborate with clients, co-facilitators, and other people with a stake in the success of my next workshop. Let’s see how.
Facilitation is often compared to an iceberg: what you see above the surface are those great learning experiences: engaging workshops with lots of markers, sticky notes and activities. But a lot more happens, particularly before the session, that meets the eye. A lot of thinking and back-and-forth exchanges led to participants having that engaging experience they’ll remember.
In this article, we’ll be looking step-by-step at what I do to organize a workshop agenda using SessionLab. Besides showing the tool, my aim is to share tips and shine some light on the “black box” of what happens at my desk between the initial “let’s do this workshop” idea and actual delivery.
This might help you if you are a newcomer to facilitation, if you are curious to know how the Session Planner works and, of course, if you are an expert user and facilitator looking for insider tips and some new ideas.
Ready to go? Here is what we’ll cover!
From blank canvas to initial design
The work that goes into taking a session from a blank canvas to an early design is usually quite a solitary stage: I probably have a bit of input from the client, but most of the discussing and collaborating comes later, once we have a basic draft to work from. This is really where I get to put my mark on the session by advising what type of framework to use, and recommending specific activities that will form the core of the work.
What I need at this point is a combination of:
- structure: to make sure I work efficiently, I need a structured approach to organizing my thoughts and defining a timeline;
- flexibility: this early in the process there is not much about the session that is fixed. I need to be able to play around with ideas until things are better defined (a low-tech way of doing this is with sticky notes on a sheet of large paper);
- inspiration: to keep my sessions fresh and creative, I need space for new ideas, and ways to explore different types of activities to suit the session requirements.
In the next few paragraphs I’ll show you how I go from a vague idea to a completed outline for a session, keeping flexibility, structure and inspiration in mind.
Starting the design process from a blank session
What are we usually starting with when designing a new workshop or session? In my experience, I often begin with very little information. I work as a freelancer, so the very start of a new job might be an email or call with a potential client: at this stage, what’s important for me is to clarify what information about the workshop is known, and what is still to be uncovered.
Known constraints might include things like the venue, date, or participants in the workshop. There might be a title, or there might just be a vague need that needs to be drawn out in later meetings and conversations.
In the example I’ll be using throughout this article, a client has asked me for a one-day workshop to get their team aligned on their values. I know the group consists of about 25 people, and I understood from an early conversation with their CEO that they don’t want the workshop to aim for decision-making. They want great conversations and insights, and enough material for their management team to then make a solid, well-informed decision.

In our initial conversation, it was clear that the whole management team is keen to have the workshop to be dynamic and experiential. At the end, they’d like to have a shortlist of possible values to pick from, as well as have the whole team interested, engaged, and clear on why this process is important for the company.
In terms of my back office, what is important to me at this stage is that I have a place to capture such information. If there is a lot of background information, such as lengthy project briefs in PDF format, I’ll create a dedicated Google Drive folder to dump all the documents in.
In this case, though, the information is simple enough that it can be summarized in a couple of notes. I write those down on a couple of notes: experience has taught me this will come in handy later. Here are a couple of reasons why:
- When working on my own: I have a deplorable tendency to fill workshops with too many activities, and having basic information clearly noted at the top of my session helps me make better decisions about what to keep and what to ditch.
- In later meetings with my clients: being able to quickly refer back to the original brief can be helpful for clarity, simplicity, and coherence. “I see we are uncertain about how exactly to frame the question for this activity.” I might say, “There are a lot of different ways this could go. But if we look back at where we started, we were looking to align on company values, right? So how about we ask what values are already present, and what values are missing?”
Starting from scratch, I’ll add a short description of the session, a title, and a date. At this early stage of design, I make use of the Notes function a lot.
In this example, I’ve added a note for myself with an initial to-do list, and a second one with information on what is known about potential workshop participants, needs, and stated workshop goals. I use yellow for notes to myself and then add red ones for messages I’ll need my co-facilitators to pay extra attention to (more on this later).

Anchoring the session: adding a start and end time (and breaks)
The next thing I’ll do when organizing my workshop in SessionLab is give it clear boundaries in time. I make sure the starting time is correct, then immediately go to the ending time and set that as well. The default setting for a block (the individual bits a session is made of) is to last 10 minutes, but I set the very last one to zero minutes, lock the time, and call it “End of session”. This helps me see how much time is actually allocated to the workshop.

In this case, it looks like I have about 8 hours to work with. But is that really true? Of course not: people need to eat! Therefore, the next thing I do is factor in lunch breaks, plus some other breaks scattered during the day.
For this teams values workshop, I’ve added an hour for a lunch break and two 15-minute coffee breaks, one in the morning and one in the afternoon. I know I’ll probably change the exact timing of those later, but at first, I am looking to find out how much time I can count on for my content and activities.

The color-coding is quite helpful here: breaks are by default bright yellow, which I appreciate for extra visibility. The workshop now starts to reveal itself as a series of four modules, two in the morning and two in the afternoon, each somewhere between one hour and two hours long. Again, I’ll be settling on the exact timing later, but having some boundaries helps me start thinking about the next part: finding a framework or storyline for my session.
Creating the framework for a successful workshop
The basic scaffolding for the day is done, and now comes the fun, creative part most facilitators relish: creating a storyline, a narrative framework for the session, and populating it with activities.
The best workshops and training courses are not a random collection of disjointed parts: they create a flow. In the space of a day, I aim to guide the group from confusion, or just not-knowing, to moments of insight, all the way to action planning; from ideating to choosing a way to move forward. At this stage of the planning process, I am thinking in terms of which framework will best help me create a flow for the group.
When designing training courses, I usually go for Kolb’s experiential learning cycle (which you can learn more about in this template), but in this case I’ll be designing a facilitated session, not a training course. As the facilitator, I’ll be accompanying the group through content they will provide themselves.
The stated objective of this workshop is to go from ideation to having a shortlist of values for management to pick from. It thereby makes a lot of sense to apply the “diamond of facilitation”. There will be activities for divergence (ideation, brainstorming), emergence (discussion, deeper understanding) and convergence (choosing, selecting).
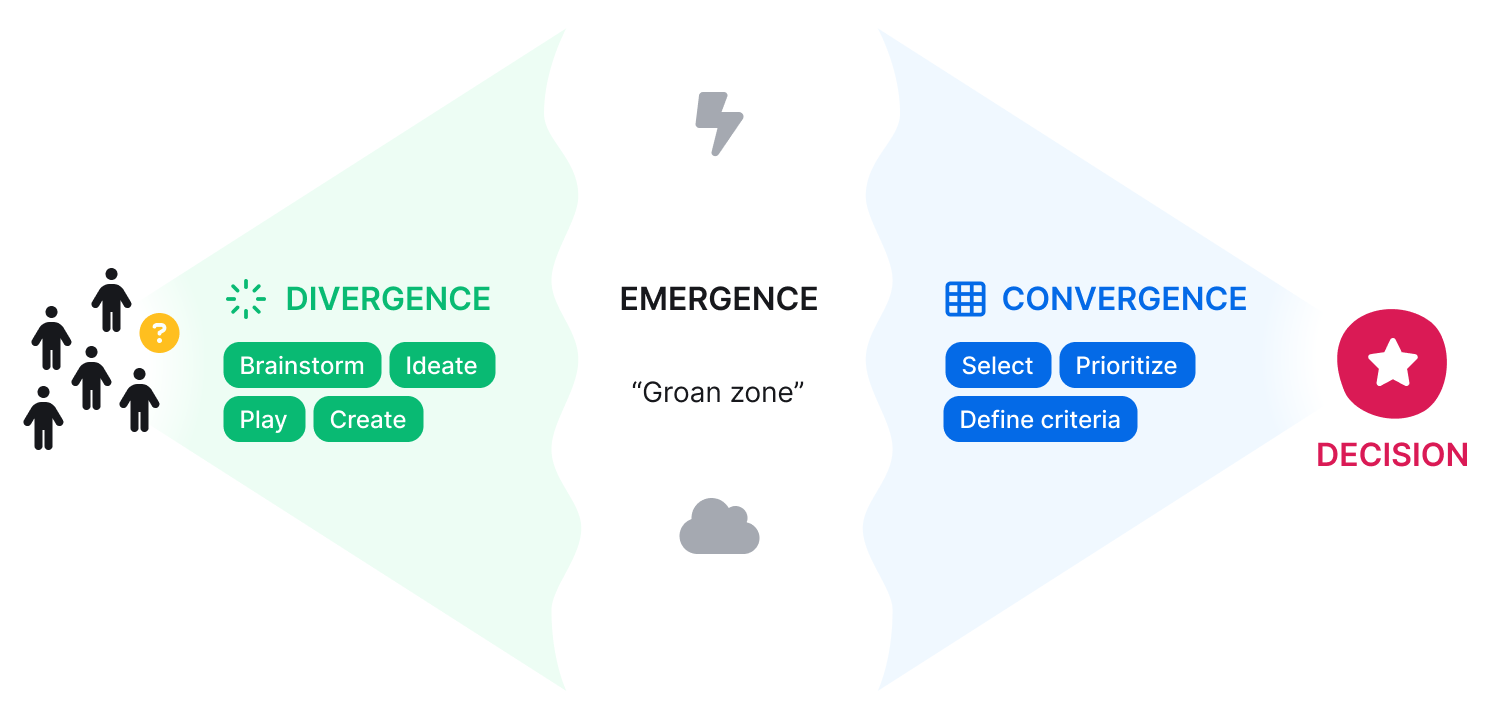
To clearly show this distinction in my session, I could use colour-coding; when the session is complex and, in particular, for training courses that include many different learning objectives, I’ll often do that. In this case, I prefer to create “groups” which I will then populate with activities.

As you can see in the screenshot, I’ve created different groups for each section of the framewor. I’ll populate them later, and probably change the titles at well, but this helps structure my thinking and keep the flow consistent.
I notice that the lunch break corresponds to the “emergence” stage of work, which I’m glad to see, because facilitating the emergent stage is often best done by adding some unstructured space and time for ideas to be freely discussed. This gives me an idea to add a playful activity over lunch, something I often do by putting on the lunch tables some bowls full of generative questions, related to the topic at hand but also bringing more personal or emotional aspects into the conversations.
I recently facilitated a networking workshop for 80 researchers involved in forestry activity in the EU context, I filled bowls with questions such as “what was a forest or tree you’d visit as a child?” and “have you ever found yourself witness to a forest fire? How was it?”. I left the bowls on the lunch tables with a small card instructing people to simply “Pick a card; Share your answers”. Not everyone did this activity (I am against “enforced fun” during breaks), but among those who did, some came back to me to tell me it led to deep and touching conversation.

Picking facilitation methods using SessionLab’s library
I now have an outline for the team values workshop, but it’s very empty! Time to consider what activities I’ll want to propose. I generally start with one or two activities that will form the core of the experience, around which I’ll then plan the rest of the session. Typically, I first think about what those could be, then go look for them in SessionLab’s library. This library of methods is seamlessly integrated into the Session Planner: by clicking on the book icon, I can access both the public library of over 1400 methods, and the private library of methods I’ve used before.
The workshop I’m designing here is about defining team values. I’ve recently held an exercise about our team’s values for the SessionLab team and would like to repurpose it.
I find it in the library and drag-and-drop it to the emergence phase. It’s a participatory activity, so I also color-code it in green as “exercise”. This will help me later to check that I have a nice mix of exercises and group discussions for the workshop.
What I am looking for in the completed workshop structure is to make sure there is going to be space for active participation and to co-create meaning. With color-coding, I can see at a glance if the entire workshop has enough variety, keeping energy levels high, and combining any presentations with hands-on activities. If you’d like to learn more tips and tricks about how to create engaging training activities, you can read an article about it here.

In my experience, the activities I pick for sessions fall into four broad categories:
1) Activities I’ve created myself and am re-purposing, like the example above. I love the creative part of facilitation, so there will likely be for any given workshop at least one activity that is my own concoction. For this, I go to my private library in SessionLab. This forms my personal knowledge base, growing in time to contain all the tools I use most. If I were working as part of a team, company or agency, I could see all my team’s methods here.
2) Well-known, established activities. My go-to favorites are 1-2-4-all from Liberating Structures, and the World Café (which is also a Liberating Structure, although I’ve learnt it from the World Café community and Juanita Brown and David Isaacs’ book). These exist in the SessionLab public library, so I can drag-and-drop them from there. The actual work to be done on these activities will be about crafting engaging questions that fit the target audience.
3) New activities I’ll create for this specific group. If I have some time, I try to add many details and information to these in SessionLab, so I can then refer back to them as library cards and even, if I think they are good enough, contribute to building a collective knowledge base by adding them to the public library. If you’d like to contribute, it’s easy to do: read how to in this article.
4) Energizers, icebreakers, check-in questions, debrief questions, opening and closing group activities that frame or complete the workshop design. These are usually quicker things, taking 10 to 15 minutes maximum. When designing a small-group workshop like this one, I usually just put a placeholder block for “energizer” in my draft schedule. I will then pick one off the top of my head in the moment, depending on the mood of the group.
In other cases, I might be working with a client who wants a clearer sense of what we will do in advance, or maybe with a larger event or conference where, typically, things need to be tightly scheduled. If that is the case, I’ll pick something from collections like these icebreaker activities or these ideas for check-in questions.
Some of these activities will form the opening and closing sections of my workshop, which I like to delineate quite early so I can make sure to protect time for them. An introduction part is needed to orient people, give them information on the workshop and start creating connections (with me, with the topic of the workshop, and with one another) before we jump into the main content and activity.
The closing part is essential in order to consolidate learning, set action points, collect participant feedback, and end the experience on a positive note, rather than risk rushing through the end. I like to create a dedicated color category for these activities, in this case pink, that I call intro/outro.

By adding the activities I think best fit this session to my plan, I now have a high-level draft. A lot of details are still missing at this stage, and the timing is tentative, with plenty of “TBD – To Be Discussed” notations. But it’s good enough for me to go into an initial meeting with.
A few things have crystallized in my mind: I know I want to do the “values tour” activity towards the end. It’s a memorable activity that gets people moving and engaged in a multi-sensory way, and by the end of the workshop, we should have a short enough list of company values to work with. I also know there should be a long phase of divergence, lasting most of the morning, and I have tentative ideas of how to make it happen.

How to save time (and avoid mistakes) with automatic time adjustments
My favorite feature in SessionLab is automated time adjustment.
If you’ve ever tried to plan a workshop, you know there is a lot of fine-tuning and fidgeting with the timeline.
Upon second thought, that activity will take 45 minutes, not 30. Information comes in from the catering company that the lunch needs to be moved by half an hour. A local official decides to come in and give a welcome introduction, adding 5 minutes to the first section. In SessionLab you can just drag-and-drop activities, or change the timing, and it will get re-adjusted by what to me (not a programmer!) seems like magic.
For example, in the values workshop I am working on, I’ll probably keep the emergence phase quite short and move to an activity that is more about converging. As we’ve seen, I’m hoping spontaneous conversations over lunch will be enough to give people time to air their thoughts. This means the break is now much too close to lunch. I’ll need to move it to after another exercise.


Before discovering SessionLab, I was organizing workshops in generic text tools like GoogleDocs, or in Microsoft Excel. While these can work for very simple plans, they are certainly not designed with the interests of a workshop leader in mind!
Adjusting timings was always a particular headache, and I can remember various instances where I made timing mistakes that resulted in last-minute panic scambles to re-adjust timings and activities. I much prefer to dedicate my attention to shaping a collaborative environment and delivering impactful workshops than to triple-checking that I’ve counted minutes correctly!
Parking activity ideas for future use
The parking lot is another feature I use quite a lot in these early stages of design. It’s a place where to “park” any activity, method, or other block that I don’t currently need but might find a place for in the future.
If I’ve filled my potential agenda with too many activities, I might decide to set one aside in this space. It’s also a place to list possible energizers and games that I’ve found in the library and might want to use, I’m just not sure about it yet.

Completing the initial design for my next workshop
So far, my work has been a solitary one, working from memory, past notes and the library of methods. In recent times, I’ve started opening the AI assistant tab when I feel stuck: I find it helps me explore ideas and reenergize my thinking.
I do find this helpful to get unblocked if I am stuck, although personally, I can easily fall into a rabbit-hole of curiosity for more and more ideas, so I have to be careful both with ideating with AI and with perusing the Library!

Let’s say I’ve managed to not get too lost: the rest of my work now is about refining timings and fine-tuning the order of my activities. It’s usually a good idea to leave the desk for a while at some point, maybe go for a walk, and return to workshop planning again later, or the next day, with fresh eyes.
If you want to take a look at what the completed session for a day of teamwork on company values turned out to be like, check out this completed template. It gives time for workshop participants to discuss their existing situation, brainstorm possible values that fit their current company and reflect their aspirations for the future. They then have the opportunity to choose a set of potential values and take part in an experiential activity to clarify what they mean to them.
This particular workshop will happen in person. Based on what I know about the target audience, I am not planning on using digital tools for workshop delivery. If it were an online, virtual workshop, I’d add a column for links and a checklist of things I need to do on external tools. This might include, for example, preparing a Zoom link or a Mentimeter interactive questionnaire, or whiteboard collaboration tools like Mural and Miro.

What happens next: how to gather feedback from clients and prepare for delivery
As you’ve seen above, it’s been quite a smooth (and fun) process to go from a blank canvas to a detailed session plan. My work is not over, though!
In the next phases of workshop preparation work, collaboration becomes the focus. I’ll be sharing the plan with clients and co-facilitators, in order to get the client’s buy in and make sure we are all on the same page. SessionLab helps with this by giving me various options to show the plan to other stakeholders, and I can use comments for real time collaboration.
As workshop planning progresses, I’ll be adding columns and notes that help me make sure I have the right tools to sort out practicalities and technical aspects, so me and my co-facilitator can make sure to stay aligned and arrive on the day of the workshop fully prepared.
To learn more about how I use SessionLab to collaborate with stakeholders and prepare for delivery, read the second part of this article here. In it, I discuss different ways of sharing information and keeping everyone aligned and on the same page, using a large (150+ people) networking conference as an example.
As with any professional software, I’m sure everyone uses it their own way. If you use SessionLab differently or have something else to add, do pop extra advice and any questions in the comments.
It’s my hope this has given you useful tips and, perhaps, some new ideas on how to approach your next facilitation challenge. If that is the case, give the Planner a try, for free, from here. And drop a note in the comments to let me know how it’s going!
Deborah Rim Moiso is an Endorsed Facilitator with the IAF – International Association of Facilitators and former co-chair of the Italian IAF Chapter.
She is the author of a manual and deck of cards on facilitation available in Italian (Facilitiamoci!). Deborah has been working with groups since 2009 in the fields of innovation in education, citizen participation, and environmental conflicts.


Leave a Comment